


• ❑ Introduction
This warp-weighted loom was a joint project for my Peer and myself. For

Warp-Weighted Loom at the Wool Gathering
the most part, he provided the expertise and woodworking experience, while I provided the general design and materials, as many of the new tools as we needed, and a helpful apprentice hand when he needed something held or braced.
It took us several weekends to complete, mainly due to the learning curves involved in a project of this complexity. (The second loom we made, as a gift, used modern materials and methods, and we put it all together in just one weekend. (If you would like to see more about the thinking on why I wanted to build this first loom, look here.)
▼ ❑ Materials
This is an all-wood loom — no metal, no nails, no bolts. The intent is to have a period-style loom, even if it can’t be pointed out as a recreation of any specific period loom.
• ❑ Vintage
The idea was to make the loom *look* old, and solid. I didn’t want to use new lumber, because that wouldn’t give the same feel for a demo setting.
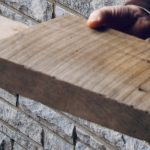
At first, I was looking for logs and branches straight from the woods to use, but while I have a ready source for those, we weren’t finding anything really suitable there. (Using that source is a long-term project, not something that can be done in one weekend — or even one season.) I got lucky and bought a sizable pile of barn lumber for $5 at an estate auction, and culled the best boards out out of the pile.
These beams are true 2″x6″ boards, and are definitely a hardwood of some sort — the woodworking experts I have shown it to have said butternut or

Loom Boards
white walnut. There are plenty of tiny wormholes throughout the wood, adding to the vintage feel, and occasionally adding to the problems of handling the wood. One of the arms has a fractured corner, due to us cutting into an area that was particularly worm-eaten. There are also some odd cracks that we were forced to work around, as well as a few nails we had to dodge.
The crossbeams that we are using to steady the uprights are not from the same batch of wood. They are “aged” 1″x3″ boards, found in the garage, and they have not survived as well as the barn beams have.
• ❑ Modern
The only truly “modern” wood we have used is the cloth beam and heddle beams, and the pegs for the cross-pieces. We couldn’t find any vintage wood that would fit those roles, so modern had to be used.
• ❑ Scraps

Peg of scrap wood
The main place where we have used scrap wood, so far, is in the pegs to hold the mortice and tenon joints in place. We still have plenty of scraps left, including a couple of long beams, so we do have spare wood if we want to improve our structure.
▼ ❑ Tools
We tried, for the most part, to use modern tools only when necessary. Unfortunately, due to some time constraints we put on ourselves, we did have to use them fairly extensively in some areas. In others, though, we wound up using hand tools that have not changed much in functionality over the centuries.
• ❑ Saws
The saws were an exercise in amused frustration. We discovered the table

Circular saw
saw was inoperable due to a missing its safety switch. The first circular saw simply gave up the ghost after two minutes. The final circular saw was a trooper, once we got the correct blades for it — a fresh titanium edge
Hand saw
on a hardwood blade will actually *cut* the wood, instead of essentially burning through it. And ultimately, a simple hand saw does work for the most basic cuts.
• ❑ Drills
We did use power drills in the name of expediency, though we could have used hand drills and accomplished much the same effect. The challenge with hand tools, though, would have been drilling through the hardwood with any sort of speed. (Even the power tools were challenged on some holes.) We drilled holes to start the mortice and tenon joints through the uprights, and also drilled holes to hold the pegs to secure the joints.
• ❑ Chisels
Once we had the starter holes drilled for the mortice and tenon joints, we

Chisel
had to square them up using chisels, for the most part. The holes were intended to be just a bit smaller than 1″x3″, so we tended to use a 1/2″ and a 1″ chisel, depending on whether we were taking wood out of the end or the side of the hole. Because of the age and dryness of the wood, we ran into quite a few problems, here, with the edges of the holes chipping out. There are quite a few spots where we glued the edges back on.
• ❑ Rasps

Hammer, File & Rasp
Ultimately, we used rasps to smooth the last rough edges in the holes, and to file the last of the excess wood away from the surface of the tenons. We had two styles of rasp available, and found that the open-backed rasp tended to work much better, overall, than the more solid, file-like rasp.
• ❑ Construction Techniques
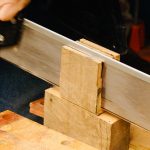
The uprights came first, though we found we had to work on the arms and

Uprights
the holes at the same time. Each arm fits only one hole, and each (hopefully) is marked.
The mortice and tenon joints are designed for strength. We want the loom to be robust, so that we can hang as many loom weights off it as might be needed for any
An Arm in Progress
project. A simple warp can have 20 lbs. of sand in the sandbag weights hanging off it. We want the loom to be able to stand up to having 100+ lbs, if the project called for it, and I believe we have achieved that.
• ❑ What we learned along the way
The main thing I learned is just how much I didn’t know about woodworking, and the complexities, especially, of working with aged hardwood.
We also learned that it’s not only important to measure twice and cut once, but also to think through the specifics of what you are trying to achieve with any particular piece. One place that shows this is the upper arm supports, where we forgot that we had intended the tenons to go in straight yet had designed the arms to be set at an angle.

Fitting an Arm
We also gained a great appreciation for the challenges of working with vintage hardwood. it may not be the easiest wood to work with, but it adds a lot of (positive) character to the project, and I am glad we made the effort.
I think we have gained a lot by building this loom, It is

Arm B4 Being Shaped
*our* loom, and we feel a definite possessiveness about it. While I do intend to share it with the other members of our fiber group, I’m hoping that using it will inspire them to build their own looms. It really has been quite fun.